Update December 2021:
This article is still up to date and works, however a much, much easier way to add a dynamic sitemap in Next.js is using the next-sitemap package. This website now uses next-sitemap! As you can see it is super easy to set up.
Introduction
A sitemap is how you tell Google what pages are in your website. This helps them get ranked higher. Take a look at the performance chart of this website.
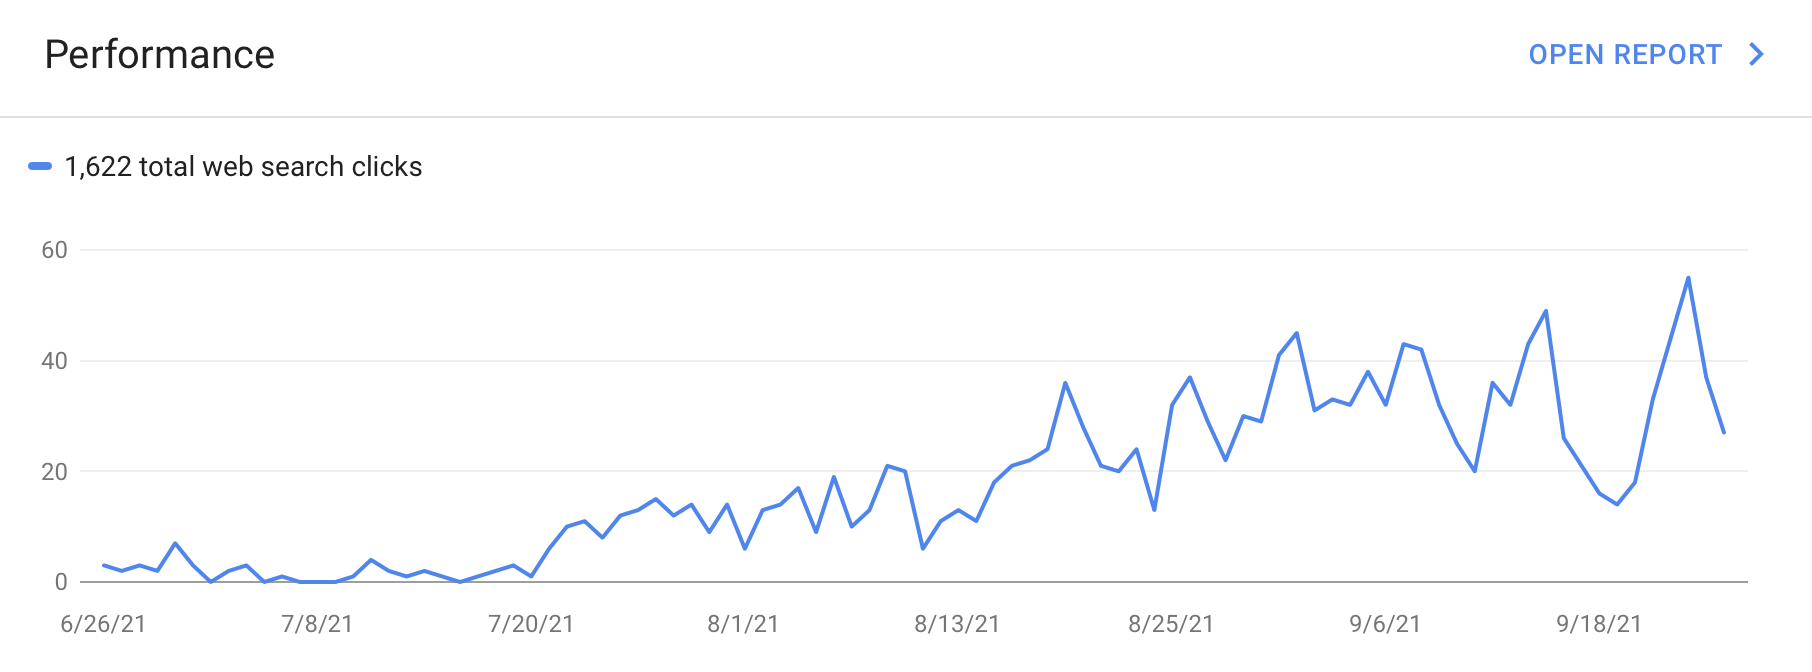
I added the sitemap on 7/20/21 and you can see the clicks spiked right after.
In this snippet, we'll write code to generate a dynamic sitemap for a React (specifically Next.js) based website.
Install Dependencies
First, install these 3 dependencies:
yarn add fs globby prettier
We will be using fs to write to our file system, globby to read and sort the files, and prettier to format our outputted sitemap.xml.
Write Code!
Create a file named generate-sitemap.js. Inside of here, require all 3 of the packages we just imported.
const fs = require('fs');
const globby = require('globby');
const prettier = require('prettier');
Next, define our async function.
(async () => {
    // we'll add code in here!
})();
Use globby to find files and directories using glob patterns
We'll initialize our prettier variable named prettierConfig and use globby to find files and directories using glob patterns. In this example, I have js pages inside of a pages folder and mdx files inside of a content folder. We can also exclude routes using !.
(async () => {
    const prettierConfig = await prettier.resolveConfig('./.prettierrc.js');
    const pages = await globby([
        'pages/*.js',
        'content/**/*.mdx',
        '!pages/_*.js',
        '!pages/api'
    ]);
})();
Create our sitemap variable
Declare a variable sitemap which will be our sitemap content. Go ahead and add any urls that were not able to be fetched with globby. Below that, map over the pages variable, remove the extensions, and add them to the sitemap.
(async () => {
    const prettierConfig = await prettier.resolveConfig('./.prettierrc.js');
    const pages = await globby([
        'pages/*.js',
        'content/**/*.mdx',
        '!pages/_*.js',
        '!pages/api'
    ]);

const sitemap = `
        <?xml version="1.0" encoding="UTF-8"?>
        <urlset xmlns="http://www.sitemaps.org/schemas/sitemap/0.9">
            <!--Base URL-->
            <url>
                <loc>https://www.example.com</loc>
            </url>
                    ${pages
            .map((page) => {
                const path = page
                    .replace('pages', '')
                    .replace('content', '')
                    .replace('.js', '')
                    .replace('.mdx', '');
                const route = path === '/index' ? '' : path;
                if (path === '/404') {
                    return;
                }
                return `
                        <url>
                            <loc>${`https://www.example.com${route}`}</loc>
                        </url>
                    `;
            })
            .join('')}
        </urlset>
    `;
})();
Use fs To Write To Public Folder
Finally, format the sitemap using prettier and write the sitemap to our public directory using fs.
const formatted = prettier.format(sitemap, {
        ...prettierConfig,
        parser: 'html'
    });

    // eslint-disable-next-line no-sync
    fs.writeFileSync('public/sitemap.xml', formatted);
Your sitemap is now available on the route /sitemap.xml!
Full Code
(async () => {
    const prettierConfig = await prettier.resolveConfig('./.prettierrc.js');
    const pages = await globby([
        'pages/*.js',
        'content/**/*.mdx',
        '!pages/_*.js',
        '!pages/api'
    ]);

const sitemap = `
        <?xml version="1.0" encoding="UTF-8"?>
        <urlset xmlns="http://www.sitemaps.org/schemas/sitemap/0.9">
            <!--Base URL-->
            <url>
                <loc>https://www.example.com</loc>
            </url>
                    ${pages
            .map((page) => {
                const path = page
                    .replace('pages', '')
                    .replace('content', '')
                    .replace('.js', '')
                    .replace('.mdx', '');
                const route = path === '/index' ? '' : path;
                if (path === '/404') {
                    return;
                }
                return `
                        <url>
                            <loc>${`https://www.example.com${route}`}</loc>
                        </url>
                    `;
            })
            .join('')}
        </urlset>
    `;

    const formatted = prettier.format(sitemap, {
        ...prettierConfig,
        parser: 'html'
    });

    // eslint-disable-next-line no-sync
    fs.writeFileSync('public/sitemap.xml', formatted);
})();
Google Search Console
The last thing you want to do is tell google where to find your sitemap. Navigate to Google Search Console and in the left pannel, click on the "Sitemaps" tab. In the "Add a new sitemap" input box, enter the url to your sitemap. When Google processes it, you should see a success status in the table!