Introduction
If you're a web developer, you've probably heard of Jamstack. Coined in 2015 by the CEO of Netlify, Mathias Biilmann, Jamstack consists of pre-rendered, static HTML that relies on client-side APIs and JavaScript to provide interactive elements. Some of the many pros of Jamstack is that it's fast, scalable, cheap, secure, and SEO friendly.
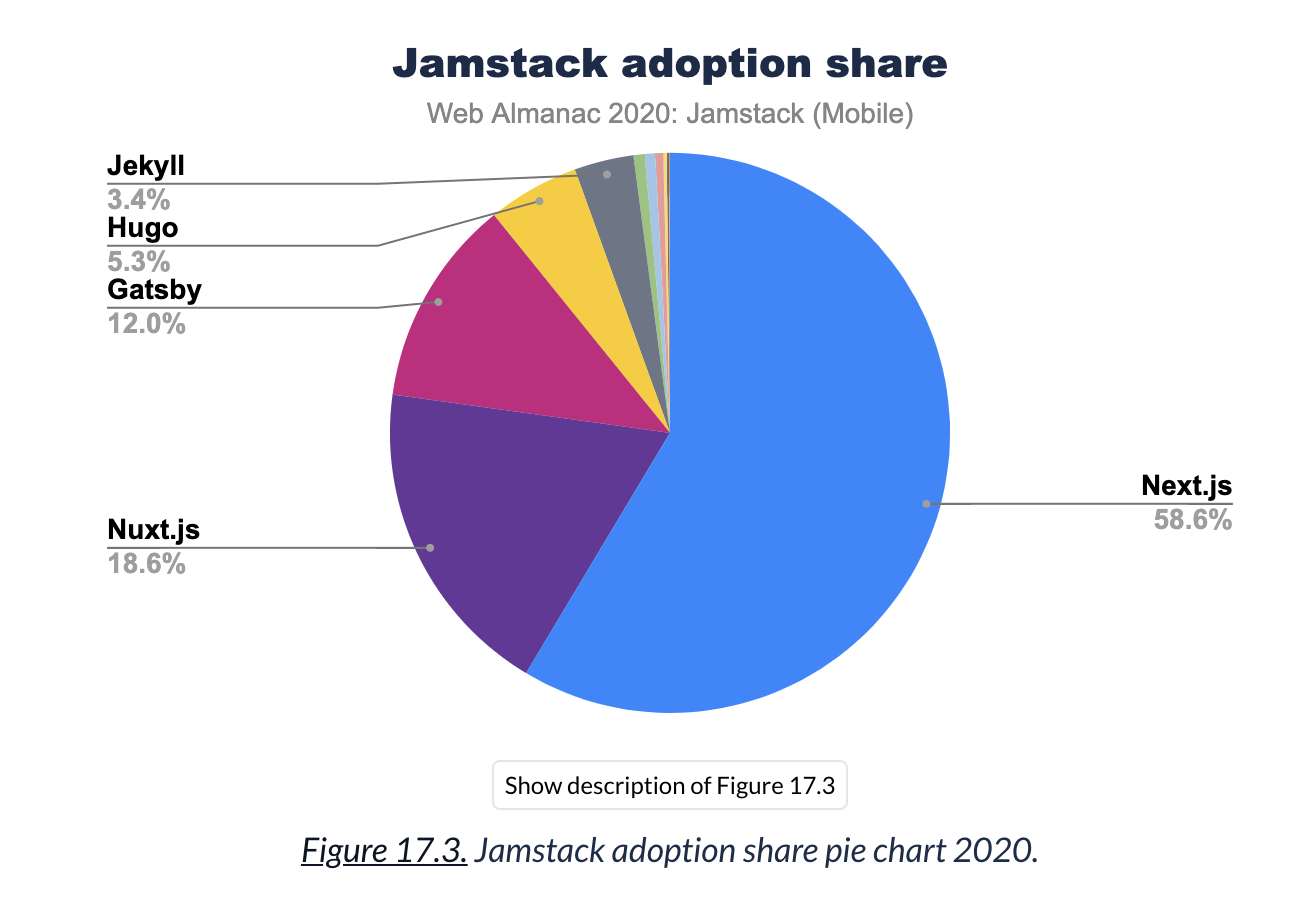
There are a lot of popular Jamstack frameworks. The main ones are Next.js, Nuxt.js Gatsby, Hugo, and Jekyll. Out of these 5, Next.js is by far the largest in terms of market share beating out second place Nuxt.js by over 3x.
In this post, you will learn Next.js by building a developer portfolio complete with a blog. You will also learn some other awesome technologies in the process like chakra-ui, next-mdx-remote, next-seo, Vercel, and more.
Starter Files Overview
To create a Next.js website, we can use the command:
yarn create next-app
When we run this command, all of the necessary files will created.
The
node_modulesfolder holds all of our yarn and npm packages such as react-bootstrap, lodash, and next.The pages folder holds, you guessed it, our pages. For example, index.js can be reached at the root of our website. In development, this is http://localhost:3000/. If we created a blog page and called the file blog.js, that page can be reached at http://localhost:3000/blog. There are 2 exceptions to this.
_app.jsis a special next.js file. It is the entry point to our app. At the bare minimum,_app.jsincludes a function that returns the page component. We can also import global css, add custom error handling, and do a couple of other advanced things inside of here. We will be coming back to_app.jsin a bit when we add chakra-UI for our css framework.- The second exception is
_document.js. This file is optional because Next.js provides it if we don't create it. If we need to add something to the<html>or<body>tags of our site, we will need to override this file. We can do that easily by creating it and adding the following code:
import Document, { Html, Head, Main, NextScript } from 'next/document' class MyDocument extends Document { static async getInitialProps(ctx) { const initialProps = await Document.getInitialProps(ctx) return { ...initialProps } } render() { return ( <Html> <Head /> <body> <Main /> <NextScript /> </body> </Html> ) } } export default MyDocument- One of the nice things about Next.js is its support for dynamic routes. Because we are making a developer portfolio, let's say we have a bunch of projects. We can create a folder called
projectand inside of it, create a file called[project].js. The brackets tell Next that this route will be dynamic. Now if we navigate to the following route: https://localhost/projects/1 we don't see any errors. - What if we wanted to grab that dynamic route and display it to the user? We can use
next/routerfor this. Inside of our file importuseRouterfromnext/router. Declare a variablerouterand set it equal to theuseRouter()hook we imported. We can now use this variable to access a bunch of different properties. In our case, we can grab the dynamic route usingrouter.query. Now, we can use this anywhere inside of our component.
The final thing you will notice inside of the pages folder is the api folder. This is where any api routes will live. Because Jamstack does not have a server (it can if you need one), all of the data and authentication can be done using api routes. Next provides us with a simple example, in which we are returning some json. This can be accessed on the route localhost:3000/api/hello. We can also consume this api endpoint in our application and display the data to the user, which we'll see in a bit.
The next folder is the
publicfolder. Inside here we can put any static images, gifs, favicons, txt files, like robots.txt, and xlm files such as our sitemap.The last folder is the styles folder. Here we can add any css or sass style sheets. We can go ahead and delete this folder because we will be using chakra-ui along with css in js to style our app.
Building Our Site
Now that you have a high level understanding, let's start building our developer portfolio.
Let's first add chakra-ui to our app by adding the yarn packages.
yarn add @chakra-ui/react @emotion/react@^11 @emotion/styled@^11 framer-motion@^4
Now, all we need to do is wrap our app with the ChakraProvider in _app.js.
import { ChakraProvider } from "@chakra-ui/react"

function MyApp({ Component, pageProps }) {
  return (
    <ChakraProvider>
      <Component {...pageProps} />
    </ChakraProvider>
  )
}

export default MyApp
Container.js
The first thing we want to do is create a page layout component that we can use in every page. Create a folder named components and inside of it, create a file named Container.js.
Go ahead and add the add the following code. The {children} text you see is the content for each page.
import {
    Flex,
    Stack
} from '@chakra-ui/react'
import Navbar from './Navbar'

export default function Container({ children }) {
    return (
        <>
            <Navbar />
            <Stack
                as="main"
                spacing={8}
                justifyContent="center"
                alignItems="flex-start"
                m="0 auto 4rem auto"
                maxWidth="800px"
                px={4}
            >
                <Flex
                    flexDirection="column"
                    justifyContent="flex-start"
                    alignItems="flex-start"
                    maxWidth="800px"
                    w="100%"
                >
                    {children}
                </Flex>
            </Stack>
        </>
    )
}
Next, let's create our <Navbar /> component. Create a file named Navbar.js and another file named DarkModeSwitch.js. For the dark mode switch, we are simply using chakras toggleColorMode() hook to determine the current color mode and style accordingly. I am also using chakra icons in this example so you will need to import those:
yarn add @chakra-ui/icons
Now inside of Navbar.js, import the switch component. There are 2 things I want to point out inside of this Navbar that are Next.js specific.
- We are using
useRouter()again to style the active item differently.router.pathnamegives us the slug. - We are using
next/link, which is a special Next.js component. It acts like an<a>tag but is for Client-side transitions between routes. It is common to wrapnext/linkaround an<a>tag. If you do this, be sure to use thepassHrefproperty otherwise you will render 2<a>tags and hurt your SEO!
Now that our page container component is complete, let's import it into index.html. Let's add some basic information to this home page like name, description, and a call to action.
API Routes
Let's take a look at one of the best features of Next.js, api routes. Earlier in this post, we took a look at hello.js, which was a simple api route. Let's create our own api route to fetch our GitHub repositories from our GitHub account.
We can do this using swr. SWR is a React hook created by the Next.js team. It handles caching, revalidation, focus tracking, refetching on interval, and more. To use it, we first need to import it:
import useSWR from 'swr'
We can then use it like such:
const { data, error } = useSWR('/api/github')
We now have the data returned stored inside of a variable data and if we have an error it will be stored inside the variable error. The data is coming from the api route github.js, a file we will create momentarily. Let's first add three return statements to handle our different states.
- An error state
- A loading state
- And a success state
if (error)
  return (
    <Container>
      <Text>Failed to load projects!</Text>
    </Container>
  )
if (!data)
  return (
    <Container>
      <Text>Loading...</Text>
    </Container>
  )
return (
  <Container>
    <Heading as="h1">Projects</Heading>
  </Container>
)
Now inside of the api folder, create a file named github.js. The syntax for an api route is as such:
export default async (req, res) => {
  return res.status(200).json({})
}
We can now use vanilla javascript to fetch data from the GitHub api. As always, refer to GitHubs official docs for any help with this.
Back inside of projects.js we can map over the data and display it.
Recall, earlier in this post, we made a dynamic route accessible on localhost:3000/projects/[pid]. We can take advantage of that here by linking to that route passing in the project name. Then from this page, we can fetch additional data on that project or we could pass it in as part of the query string.
Blog
To create a blog, we will use next-mdx-remote.
yarn add next-mdx-remote
We can store blog posts where ever we want because we will be using getStaticProps() to fetch them. In this post, and in most cases, storing them locally is the best option. Let's create a folder called posts and add our first blog post. We can store the important parts of the post like the title, description and published date in whats called the frontMatter.
---
title: "Post Title"
description: "Post 1 description"
publishedAt: "2021-07-04"
---
The rest of the content can be added below as markdown. One of the cool things about using mdx is that you can add interactive javascript components inside of the post!
Now that we have a blog post, we can create a page named blog.js and inside of here we'll query all of our posts and display them in a list view.
Before we do this, we will need some information regarding the path to the posts. Let's make a new folder called lib and a new file named mdxUtils.js. This file will export 2 variables: the path to our blog posts, and a list of all the mdx files inside of this path. Be sure to add fs and path via yarn.
yarn add fs path
Inside of our blog.js page, import both of those variables as well as fs, matter, and path.
yarn add gray-matter
Inside of getStaticProps we can declare a variable posts and map over all of our blog posts which are stored in the postFilePaths variable. We can get the source of each post using fs and then extract the content and data using gray-matter. Finally, return posts as a prop.
Now, we can pass the posts prop into our component and map over each of the posts displaying them to the user. We are using the as property on next/link which is the path shown in the browser URL bar.
You can see that we can grab any of the frontMatter by using {post.data.title}.
Individual Blog Posts
The final step is to make a dynamic page for each individual blog post. Inside of our blog folder, create a file named [slug.js]. Add the following imports and our basic post page body. You can see that we are passing in source and frontMatter. This is being fetched via getStaticProps and getStaticPaths. Inside of getStaticPaths, declare a variable paths and set it equal to postFilePaths. Recall this is being imported from mdxUtils.js and represents a list of all mdx files inside the POSTS_PATH directory. Next, remove file extensions for page paths and finally map the path into the static paths object required by Next.js. Then return the paths and set fallback to false.
Inside of getStaticProps, we are doing something very similar to what we did in blog.js, instead here we are only working with one blog post - the requested post. Declare a variable postFilePath and set it to the current url. Grab the source of the post using fs. Next, parse through the source using gray-matter. Finally, serialize the content and pass in any mdxOptions such as prism for code styling. Then, return the source and frontMatter.
In our page component, pass both of these variables in. We are setting the content of the post by the line:
<MDXRemote {...source} components={components} />
Now, you are probably wondering what the components variable is. That is where the markdown maps to its html element and it is also where we pass in our custom components. For example, we can declare a custom a tag like such:
a: (props) => <Link {...props} color={useColorModeValue("blue.700", "blue.400")} />,
We can also set our DarkModeSwitch equal to our darkmode switch component in this line:
DarkModeSwitch: dynamic(() => import('../../components/DarkModeSwitch')),
You should now be able to visit individual blog posts!
Adding SEO
We will be using the next-seo package to add some SEO to our blog.
yarn add next-seo
Create a new file called next-seo.config.js. Inside of here is where we can add a our default page title, description, etc.
Inside of _app.js, import this and add it right above our page component. Now we can add it to each of our pages.
To add SEO to our blog, we can create a file named BlogSEO.js and add our seo. We can use the article tag to tell Google that this is an article. Now, inside of [slug].js add our SEO. We need to pass in the page url dynamically so we can use the useRouter() hook to help us with this.
import BlogSeo from '../../components/BlogSEO'
import { useRouter } from 'next/router'

const router = useRouter();
const slug = router.asPath.replace('/blog', '')

<BlogSeo url={`https://example.io/blog${slug}`} {...frontMatter} />
Deploy To Vercel
After all this work, our website is now complete. Most tutorials would stop here but I am going to show you how to ship this website. Vercel is the company behind Next.js so it makes sense to deploy it there. Navigate to https://vercel.com. If you don't have an account, go ahead and create one. It is 100% free forever on the hobby plan. Before we deploy our website, it needs to be on GitHub or another git platform. Once that is done, click the new project button and select your project repository. You will need to add the vercel app to your GitHub account so it has permissions. Give your app a project name if you want a different name from your GitHub repo, and add any environment variables if you have any. We did not use any in this crash course. Finally, click deploy! After a few minutes you should be able to see your website live.
Conclusion
I hope you enjoyed this crash course of Next.js. We only covered the basics and skimmed past a lot of cool features so use the resources at the beginning og this post to keep learning.